Reviving a 2012 iOS App with Machine Learning: From SplashCam to Splash Image
Original icon designed by a friend back in 2012. New icon created with the help of AI.
Splash Image is now available on the App Store.
In 2012 I shipped my first App Store app: SplashCam, a camera app that applied a real-time colour splash effect, turning everything grey except a chosen hue. It worked, people used it, and then it quietly sat in a drawer for over a decade while iOS changed around it.
Earlier this year I decided to bring it back, but not just fix it. I wanted to rethink it. The live camera approach got scrapped in favour of a photo editor powered by Apple’s on-device ML, and the result can do something the original never could: understand what is in the photo, not just what colour it is.
A quick disclosure before going further: I started this revival on my own, but at some point I began leaning on AI to speed up the mechanical parts. Translating deprecated API calls, scaffolding test cases, looking up Vision and CoreImage signatures I hadn’t touched before. The architecture, the decisions about what to keep and what to cut, the shader work and the detection pipeline are mine. AI mostly made the typing faster.
One more thing worth mentioning upfront: I kept Objective-C. The codebase is from 2012, most of the original structure was still worth preserving, and I genuinely like the language. What changed is everything around it. The old third-party frameworks are gone, modern APIs replace every deprecated call, and the new ML pipeline uses the same Vision and CoreImage headers you’d reach for in a fresh Swift project. It feels current because the APIs are current, not because it was rewritten for its own sake.
What the Original Looked Like
The project was started in April 2012, back when UIAlertView was still the way you showed a dialog and @synthesize was something you typed on every property.
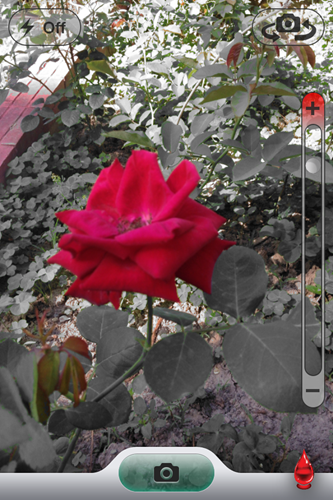
The colour splash effect
The core trick was a GLSL fragment shader running on OpenGL ES. Given a camera frame as a texture, it computed the hue of every pixel and compared it against up to six target hues. Pixels whose hue fell within a threshold kept their colour; everything else was pushed to greyscale using the classic luminance formula (0.30R + 0.59G + 0.11B).
// SplashColor.fsh (2012) - OpenGL ES fragment shader
precision highp float;
uniform sampler2D s_texture;
uniform float target_hue[6];
uniform float threshold[6];
varying vec2 v_texCoord;

void main() {
    vec4 color = texture2D(s_texture, v_texCoord);
    float hue = atan2(sqrt3*(color.g - color.b),
                      dot(color.rgb, vec3(2.0, -1.0, -1.0)));
    float br = 0.0;
    for (int i = 0; i < 6; ++i) {
        float dHue = abs(hue - target_hue[i]);
        dHue = min(dHue, 2.0*pi - dHue);
        br += clamp(threshold[i] - dHue, 0.0, 1.0);
    }
    br = clamp(br * 100.0, 0.0, 1.0);
    float gray = dot(color.rgb, vec3(0.3, 0.59, 0.11));
    gl_FragColor = mix(vec4(gray), color, br);
}
The rendering layer was XBImageFilters, an OpenGL ES camera filtering framework written by a friend of mine (xissburg). The framework was bundled directly in the repo as a compiled binary, alongside Crashlytics and Flurry. Dependency management in 2012.
What else was in there
- ShareViewController: a custom share screen for posting to Facebook (bundled
SCFacebook.mwrapping the old Facebook iOS SDK) and Twitter (viaMGTwitterEngine+ OAuth, another ~30 files committed to the repo) - FlurryAnalytics and Crashlytics: both as static
.ablobs or binary frameworks - ColorRangeGroupView: a custom colour picker with swipe and pan gesture recognisers, wired up through IBOutlets in a storyboard
- The entire camera, shader, gesture handling, colour state, and share flow lived in one
SplashCamViewController, around 1 300 lines
The fundamental limitation
The hue approach works well for something vivid and isolated, like a red dress against a neutral background. But it breaks down fast. A yellow sunset and a yellow taxi share the same hue. A green tree and a green jacket are indistinguishable to the shader. The effect was cute, but you were always fighting the physics of colour rather than selecting the thing you actually cared about.
What Had to Go First
Before any new features, the project needed to compile on a modern SDK. That meant:
- Removing OpenGL ES: deprecated since iOS 12 and gone from simulators
- Ripping out all the bundled frameworks: Facebook SDK, Twitter+OAuth, MGTwitterEngine, Flurry, Crashlytics, XBImageFilters (~15 000 lines of third-party code deleted)
- Replacing UIAlertView, MediaPlayer, and other deprecated APIs with their modern counterparts
- Switching from a storyboard-driven flow to a programmatic one using a modern
AppDelegateandUIButtonConfiguration
The code stayed in Objective-C throughout. Modern Objective-C with full nullability annotations (NS_ASSUME_NONNULL_BEGIN, _Nullable, _Nonnull), @available checks, NS_UNAVAILABLE on initialisers that shouldn’t be called. It reads nothing like the 2012 original, even though it compiles to the same language.
The Pivot: Drop the Live Camera, Use ML Instead
Once the codebase was clean, I started rebuilding the camera: Metal shader, AVFoundation pipeline, a logarithmic zoom wheel modelled on Apple Camera, AE/AF lock, macro mode on supported devices. It all worked. And then I decided to throw most of it out.
The live camera filter had the same problem as the original: it was still hue-based. You could splash red, green, or blue in real time, but you still couldn’t say “keep the dog in colour, grey out everything else.” The effect is most compelling when it acts on a recognisable subject, not an arbitrary band of the colour wheel.
Apple’s Vision framework gained VNGenerateForegroundInstanceMaskRequest in iOS 17. It uses an on-device ML model to detect every distinct foreground subject in an image and return a per-pixel mask for each independently: person, animal, object, whatever the model can segment. That changes the question from “what hue do you want?” to “which thing do you want?”
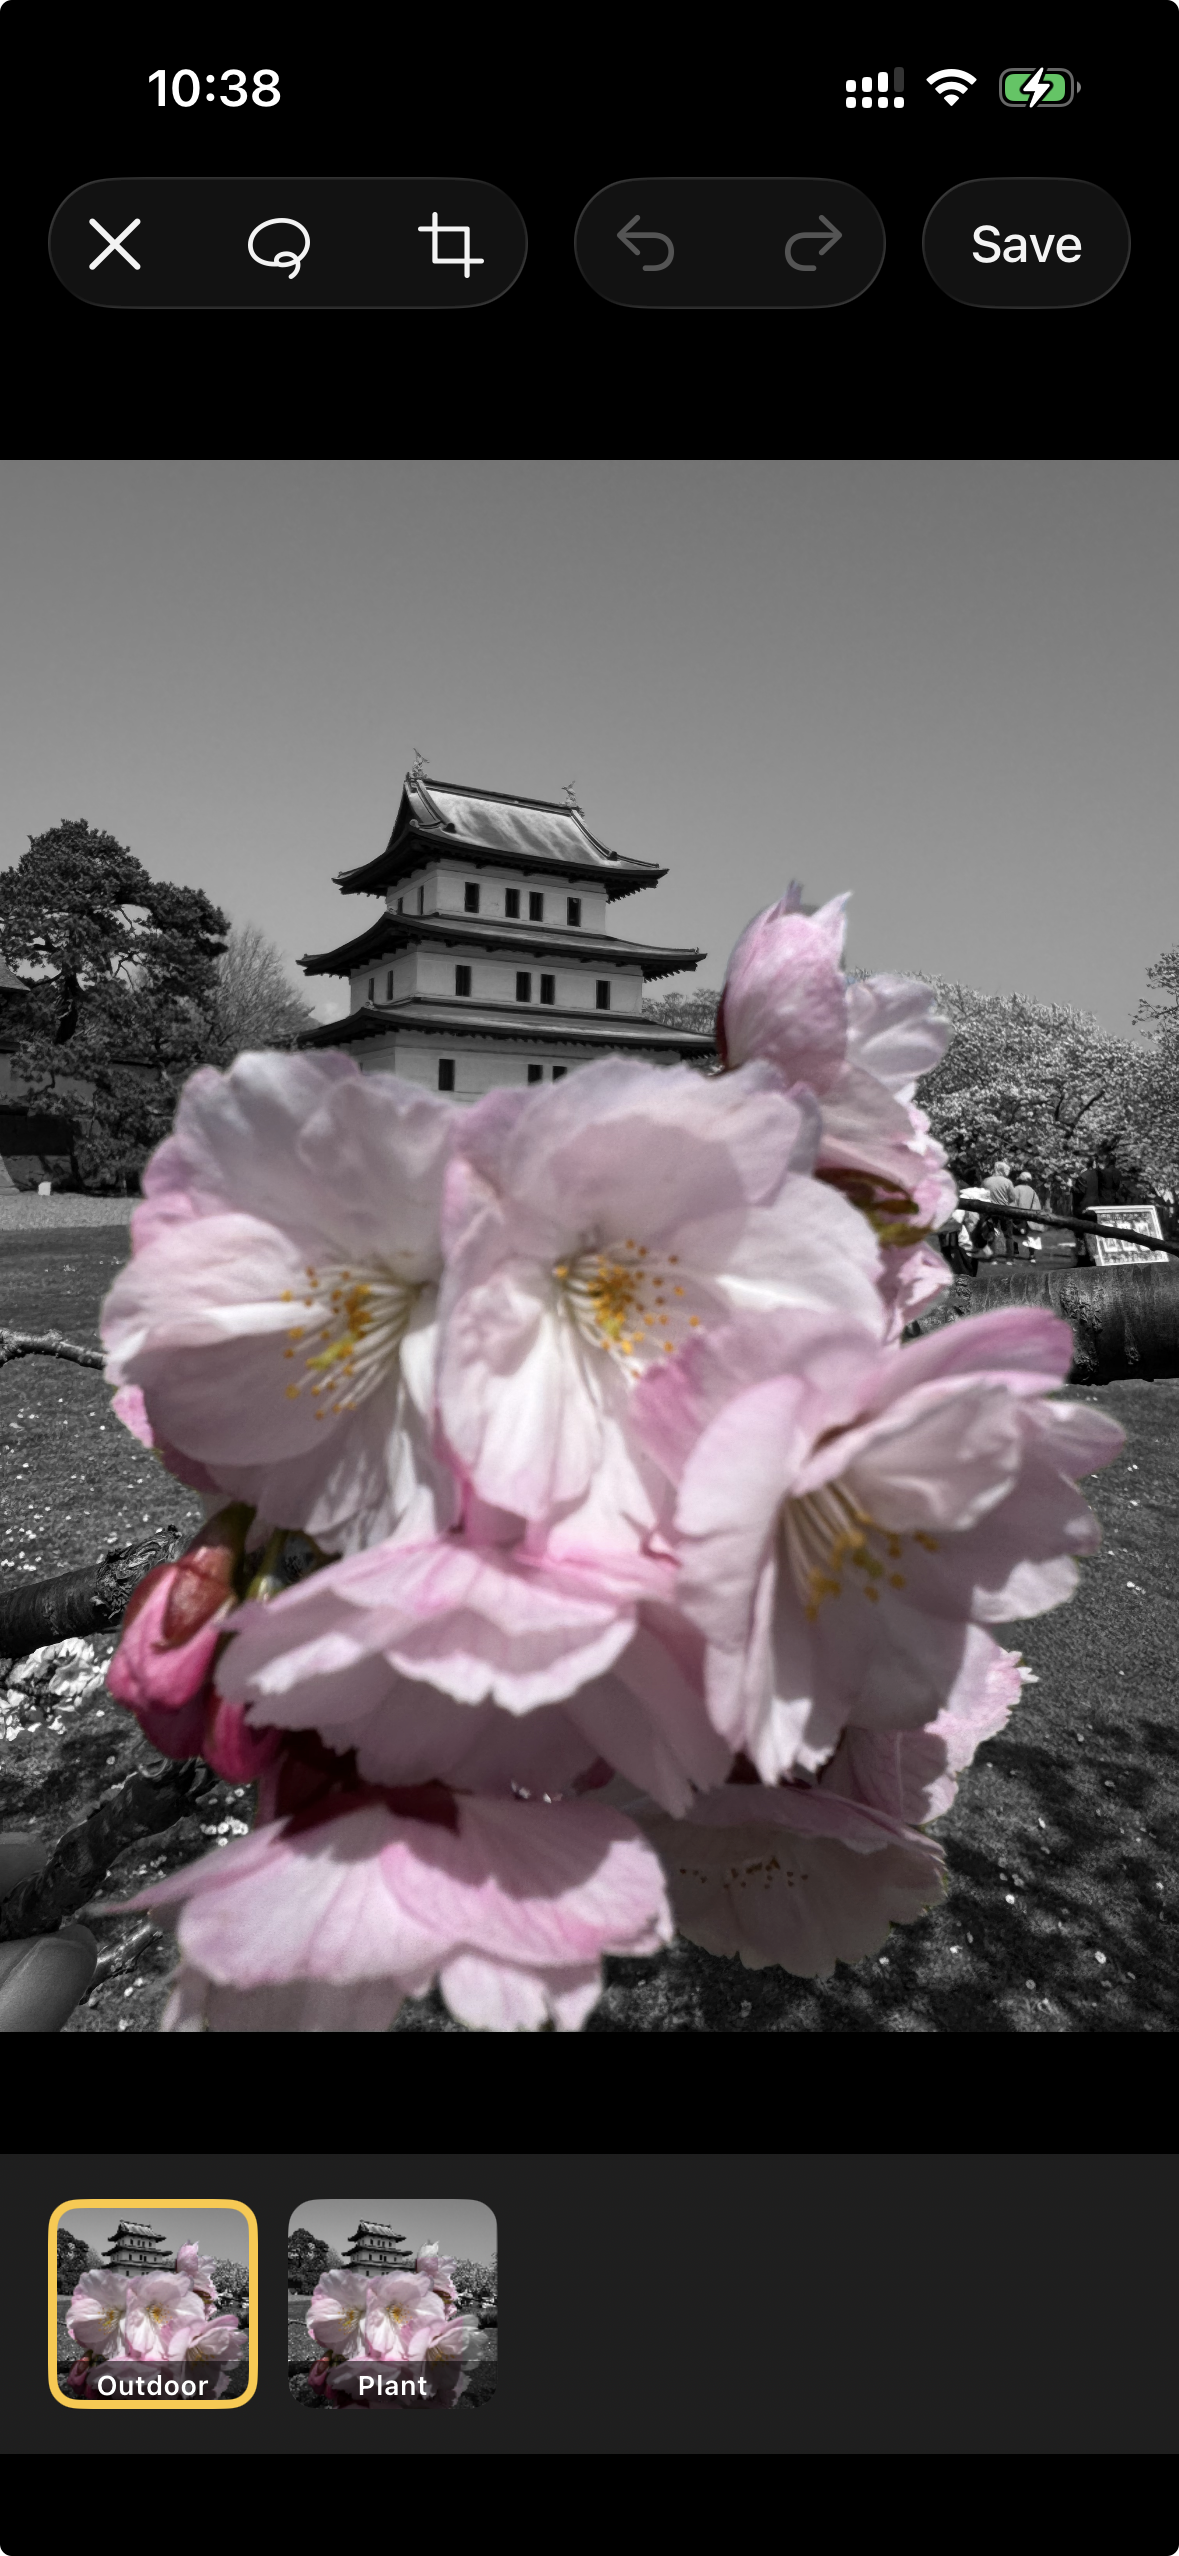
So the app became a photo editor. The home screen has two buttons:
- Take Photo: opens the system camera, captures the photo, and immediately hands it to the editor
- Choose from Library: opens
PHPickerViewControllerand does the same
Neither path shows a live filtered preview. Both feed a still image into SCGalleryEditorViewController and let the ML do the work.
The Detection Pipeline
The interesting part is in SCSubjectSplashProcessor, which turns a CIImage into a set of independently selectable per-subject masks. It runs a sequence of Vision requests, each covering a different class of subject (a fifth, objectness-based stage was added during the pre-launch polish described later).
Stage 1: Person segmentation (iOS 15+)
VNGeneratePersonSegmentationRequest *personReq =
    [[VNGeneratePersonSegmentationRequest alloc] init];
personReq.qualityLevel = VNGeneratePersonSegmentationRequestQualityLevelBalanced;
personReq.outputPixelFormat = kCVPixelFormatType_OneComponent8;
This runs first and its result isn’t immediately added to the instance list. Instead, it becomes a reference mask used in stage 2 to split mixed instances. It also acts as a standalone fallback: if the foreground instance detector misses a person, the person mask is added on its own after deduplication.
Stage 2: Foreground instance segmentation (iOS 17+)
VNGenerateForegroundInstanceMaskRequest *fgReq =
    [[VNGenerateForegroundInstanceMaskRequest alloc] init];
This is the primary detector. It returns VNInstanceMaskObservation.allInstances, an NSIndexSet of 1-based Vision instance indices. For each index, generateScaledMaskForImageForInstances:fromRequestHandler:error: produces a per-pixel CVPixelBufferRef at source resolution.
Each mask then passes through the person-split step.
Person/object split
A lot of interesting photos involve a person holding or interacting with something: a musician with an instrument, someone holding a flower. Vision’s instance detector often groups the person and the held object into a single mask. The person-split checks whether an instance mask straddles that boundary:
CGFloat ratio = [self _areaOfMask:intersection] / instanceArea;

static const CGFloat kLowSplit  = 0.15;
static const CGFloat kHighSplit = 0.85;
if (ratio <= kLowSplit || ratio >= kHighSplit) {
    return @[instanceMask]; // clearly one thing, don't split
}

CIImage *personPart  = [self _intersectMask:instanceMask withMask:alignedPerson];
CIImage *objectPart  = [self _subtractMask:instanceMask withMask:alignedPerson];
If 15-85% of the instance overlaps the person mask, it’s treated as mixed and split into two pieces. Outside that window it’s clearly a whole person or a whole object and returned as-is. Pieces smaller than 0.3% of the source area are discarded as noise. The result is that “person holding phone” becomes two separately selectable items in the editor’s thumbnail strip.
The mask arithmetic uses CoreImage compositing filters:
- Intersection (
CIMultiplyCompositing): treating both masks as luminance images, multiply is a soft AND - Subtraction: multiply A by the
CIColorInvertof B to get A minus B
Stage 3: Animal recognition (iOS 13+)
VNRecognizeAnimalsRequest *animalReq = [[VNRecognizeAnimalsRequest alloc] init];
This returns VNRecognizedObjectObservation bounding boxes, not tight pixel masks. A bounding box around a cat that includes the sofa behind it is useless for compositing. So for each detected animal bounding box, the code crops the source image to that region, runs a fresh foreground instance scan on just that crop, then translates the resulting masks back to source coordinates:
// Crop to CI coordinate space, shift to origin, run instance detector,
// translate masks back to source position.
CIImage *cropped  = [source imageByCroppingToRect:ciRect];
CIImage *shifted  = [cropped imageByApplyingTransform:
                        CGAffineTransformMakeTranslation(-ciRect.origin.x,
                                                         -ciRect.origin.y)];
// ... run VNGenerateForegroundInstanceMaskRequest on `shifted` ...
CIImage *positioned = [mask imageByApplyingTransform:
                           CGAffineTransformMakeTranslation(ciRect.origin.x,
                                                            ciRect.origin.y)];
This detect-then-refine approach gives the animal detection the same per-pixel mask quality as the foreground instance detector, without needing to have been explicitly trained to distinguish animal species.
Stage 4: Saliency fallback
VNGenerateAttentionBasedSaliencyImageRequest *salReq =
    [[VNGenerateAttentionBasedSaliencyImageRequest alloc] init];
Only runs if stages 1-3 found nothing at all. The saliency model identifies regions a person would naturally look at, returning salientObjects as normalised bounding boxes. The same crop-and-refine approach from the animal stage produces tight masks from those boxes.
Deduplication across stages
Running four detectors on the same image risks returning the same subject multiple times. Every mask candidate is compared against everything already in the cache using IoU (intersection over union) computed on 64x64 downscaled probes:
for (int i = 0; i < 64 * 64; i++) {
    BOOL inA = bufA[i] > 64;
    BOOL inB = bufB[i] > 64;
    if (inA && inB) intersection++;
    if (inA || inB) unionCount++;
}
return (CGFloat)intersection / (CGFloat)unionCount;
Any candidate with IoU > 0.6 against an existing mask is dropped. The 64-pixel probe is intentionally coarse; it keeps the check cheap (a single CGBitmapContextCreate per mask) while still catching genuine duplicates.
The total instance list is capped (12 after the pre-launch tuning below) regardless of how many stages fire, so group shots don’t blow up memory or clutter the thumbnail strip.
Tap to Select
When the user taps the image, the editor maps the tap point from UIKit’s top-left coordinate space to CoreImage’s bottom-left space and samples a single pixel from each cached mask:
CGFloat ciY = floor(mask.extent.size.height - point.y - 1.0);
CGRect roi  = CGRectMake(floor(point.x), ciY, 1.0, 1.0);
// render 1x1 pixel from the mask -> grey value -> [0, 1]
The mask with the highest value above 0.5 wins. Tapping the same subject again deselects it. Multiple subjects can be selected at once and their masks are unioned before compositing.
The Compositing Pipeline
renderCIImage produces the final splash output as a CIImage without touching the GPU until something actually reads pixels:
// 1. Greyscale using the same luminance formula as the 2012 shader, via CIColorMatrix
CIImage *gray = [self grayscaleImageFromSource:source];

// 2. Union the selected instance masks
CIImage *combinedMask = [self combinedMaskForSelectedInstances];

// 3. Punch holes where the user has drawn exclusions:
//    finalMask = combinedMask x (1 - unionOfExclusions)
if (unionExclusion) {
    CIImage *inverted = [unionExclusion imageByApplyingFilter:@"CIColorInvert"];
    CIFilter *mult    = [CIFilter filterWithName:@"CIMultiplyCompositing"];
    [mult setValue:combinedMask forKey:kCIInputImageKey];
    [mult setValue:inverted    forKey:kCIInputBackgroundImageKey];
    combinedMask = mult.outputImage;
}

// 4. Blend: colour where mask is white, grey where mask is black
CIFilter *blend = [CIFilter filterWithName:@"CIBlendWithMask"];
[blend setValue:source       forKey:kCIInputImageKey];
[blend setValue:gray          forKey:kCIInputBackgroundImageKey];
[blend setValue:combinedMask  forKey:kCIInputMaskImageKey];
The greyscale step replicates the 2012 shader formula using CIColorMatrix with the same R/G/B weights, just expressed as CoreImage vectors instead of a GPU dot product. The visual feel of the effect is the same; only how the subject gets selected changed.
Corrections with Lasso and Eraser
ML segmentation isn’t perfect. Edges bleed, similar-looking regions get merged, a bright shirt merges with the bright wall behind it. Two tools let the user fix this — one additive, one subtractive:
Lasso (additive): circle a region the automatic pass missed and the editor re-runs detection scoped to that area, clipping the result to the outline you drew. It adds a new selectable subject rather than removing one. The details — and the bug where it used to select a rectangle — are in the pre-launch section below.
Eraser (subtractive): paint strokes that accumulate into exclusion polygons on the fly via a UIPanGestureRecognizer. The editor converts each polygon to a CIImage mask at source resolution and appends it to the processor’s exclusion list. Those pixels get subtracted from the final composited mask via the (1 - exclusion) multiply step above.
Each exclusion is independently toggleable in the thumbnail strip, so you can turn one off to check whether it was actually needed before committing.
Metadata Preservation
The old app discarded every byte of EXIF when saving. The new one reads the source image’s metadata via CGImageSourceCopyPropertiesAtIndex, merges it with the output JPEG, and only overwrites the fields that actually changed: orientation, pixel dimensions, and the software tag. GPS coordinates, camera make/model, and capture date survive the edit.
Tooling
The 2012 project had no CI. You built locally, archived in Xcode, and uploaded through Application Loader.
The rewrite has:
- GitHub Actions: a
workflow_dispatchpipeline (manual trigger) that runs onmacos-latest - Fastlane with Match for certificate and provisioning profile management via a private git repo
- App Store Connect API key authentication with no Apple ID password in CI
By the Numbers
| 2012 (original) | 2026 (rewrite) | |
|---|---|---|
| App name | SplashCam | Splash Image |
| Core workflow | Live camera filter | Photo editor |
| Subject selection | Hue threshold (R / G / B) | Vision ML segmentation |
| Render pipeline | OpenGL ES + GLSL | CoreImage + Vision |
| Selection granularity | Colour bands | Semantic objects |
| Detection stages | 1 (hue shader) | 5 (person, foreground, animal, objectness, saliency) |
| Language | Objective-C (2012 style) | Objective-C (modern APIs) |
| Social sharing | Facebook + Twitter | Removed |
| Analytics | Flurry + Crashlytics | Removed |
| Third-party code in repo | ~15 000 lines | 0 lines |
| Unit tests | 0 | 738 assertions across 2 logic suites + an on-device Vision suite |
| CI/CD | None | GitHub Actions + Fastlane |
| Min iOS (editor) | iOS 6 | iOS 17 |
Pre-Launch Polish: Hardening the Detection
The pipeline above worked, but the last pass before submitting to the App Store was about the cases where it didn’t. A handful of real photos exposed three rough edges, and fixing them turned out to be the most interesting work of the whole revival.
A dense test image made the problems obvious: a tray of ~40 apples, packed edge to edge, in five rows.
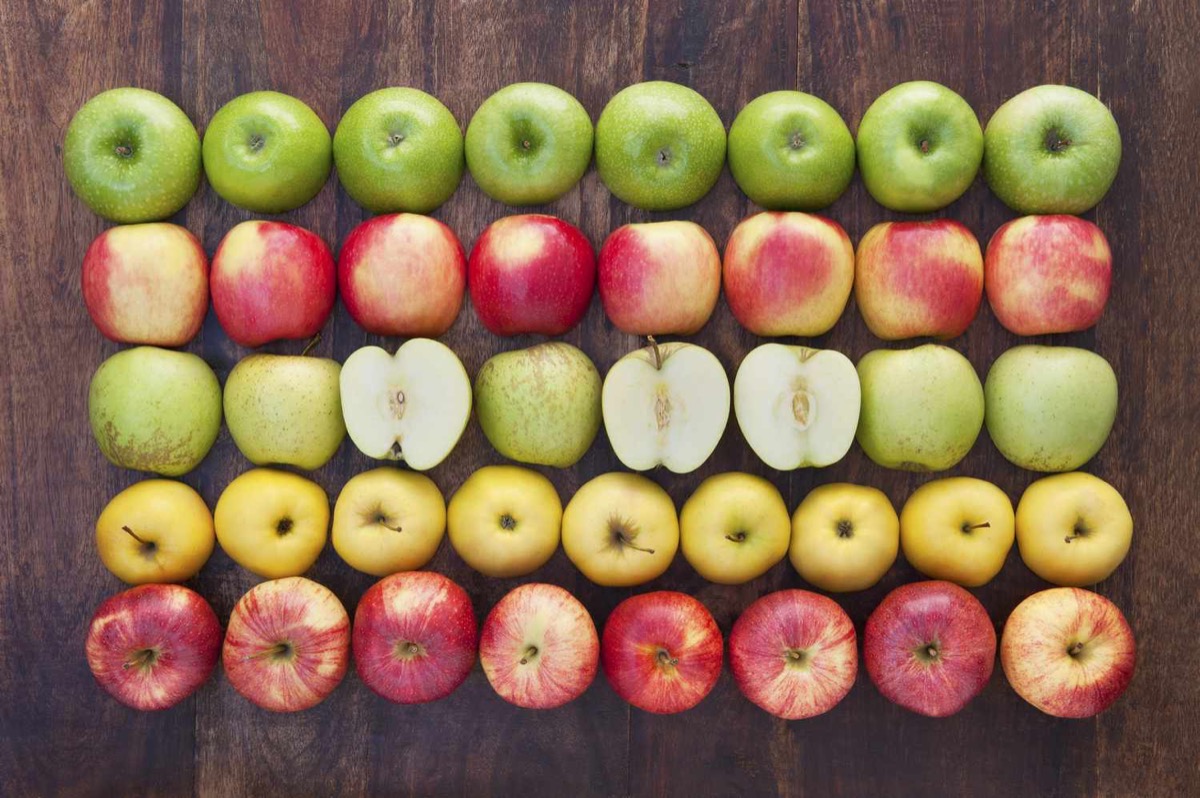
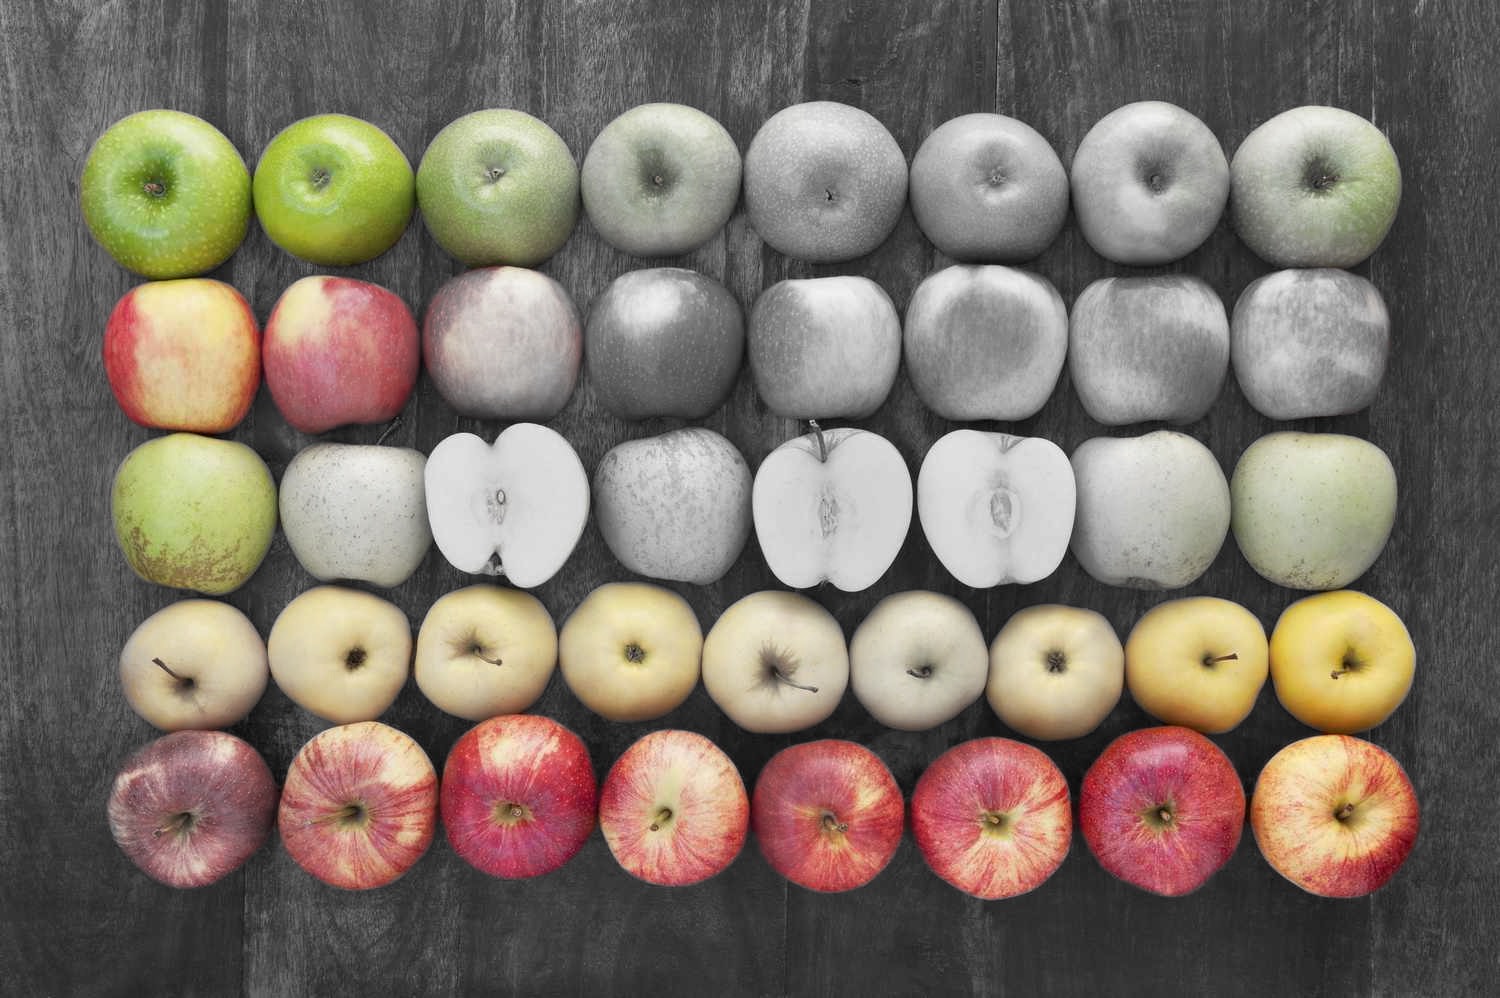
Left: the original. Right: the splash. A group of apples keeps its colour while the rest of the tray is cut cleanly from its neighbours and turned grey, with no rectangular blocks.
Problem 1: square colour blocks
The animal, saliency, and a newly-added objectness stage all share the same trick from Stage 3: take a bounding box, crop, and re-run foreground-instance segmentation to get a tight mask. But when Vision can’t isolate a subject inside the crop (busy scene, no clear figure/ground), it returns a mask that fills almost the entire rectangle. Composited, that reads as an ugly square block of colour.
The fix is a solidity guard: measure how much of its own bounding box a mask actually fills, and reject anything that behaves like a filled rectangle.
// active pixels / area of the mask's own tight bounding box.
// A solid rectangle approaches 1.0; an inscribed circle ~0.79;
// an irregular subject is lower.
- (CGFloat)_solidityOfMask:(CIImage *)mask { /* 64x64 probe */ }

static const CGFloat kSCMaxMaskSolidity = 0.90;
// ...inside the crop refiner:
if ([self _solidityOfMask:positioned] > kSCMaxMaskSolidity) return; // drop it
A round apple fills roughly π/4 ≈ 0.79 of its bounding box and passes; a failed isolation sits near 1.0 and is dropped. The guard only applies to the box-based refinement stages — the primary foreground-instance detector is left untouched, so a genuinely rectangular subject (a book, a sign) still works.
Problem 2: subjects that touch each other
VNGenerateForegroundInstanceMaskRequest segments foreground vs background, so objects of the same kind that touch — a row of apples — collapse into one blob. To recover them I added an objectness-based saliency stage (VNGenerateObjectnessBasedSaliencyImageRequest), which returns one bounding box per salient object. Running the crop-and-refine trick inside each box, then deduplicating, splits clusters the primary detector merged.
I also tried something more aggressive: a distance-transform watershed to cut a single large blob into one mask per object. It worked on paper but produced arbitrary, angular Voronoi chunks that didn’t line up with the fruit, so it got reverted. The honest limitation: with a hard cap on instances, a grid of forty identical touching objects can’t be cleanly separated into forty individual masks. But each detected subject now comes out cleanly cut from its neighbours — pick any of them and it splashes on its own, with sharp edges and no square block (above). For the realistic case — a few distinct subjects — objectness separation is plenty. The instance cap was raised from 8 to 12 to give clustered scenes more room.
Problem 3: the lasso selected a rectangle
The manual lasso was supposed to let you re-scan a region the global pass missed, but it fed Vision the bounding rectangle of your stroke. Circle one apple in a dense grid and you’d get a square of its neighbours. The rework keeps the “force a fresh scan in this area” behaviour but clips the result to what you actually drew:
// foreground detected in the circled area (existing instances
// unioned with a fresh crop re-scan) ... intersected with the
// rasterised lasso outline. Never the bounding rectangle.
CIImage *result = [self _intersectMask:drawnShape withMask:foreground];
One subtlety only a real device exposed: when you pinch-zoom into an all-subject area and lasso, a fresh crop has no background for Vision to segment against and finds nothing. Intersecting with the already-detected foreground (computed at full frame, where background was visible) makes it reliable regardless of zoom. The drawn outline is rasterised with the same path-to-mask converter the eraser already used, which guaranteed the two coordinate systems lined up.
Testing this required a real device
None of this is verifiable in the simulator — VNGenerateForegroundInstanceMaskRequest simply returns nothing there. The regression tests for the apple split and the lasso clip run the real Vision pipeline on a bundled fixture image and only pass on hardware, wired into the same scheme so they build from the command line.
What’s Next
The editing experience works well for portraits and clearly-defined objects. The main thing I want to push next is performance. The CoreImage pipeline re-renders on every selection change, and at full resolution on older devices that starts to feel sluggish with multiple exclusion masks active. A Metal-native compositing pass would collapse the mask union, exclusion subtract, and colour-swap into a single render pass.
The Android migration branch is also in progress, same concept, different stack. That’s a post for another day.
A Note on Bringing Back the Live Camera
The live camera might still come back. The Metal pipeline I built and then shelved is still in the repo, and the more I think about it, the more I think the answer isn’t really “use ML instead of hue”. It’s to use hue better, with the lessons the 2012 version taught me.
The original shader’s problem wasn’t that it relied on colour. It was that it relied on raw RGB hue, which is a fragile signal once you leave a controlled lighting setup. Most of its failure modes have well-known fixes:
Work in HSV, not RGB. RGB tangles colour identity with brightness, so a red shirt in shadow and a red shirt in sunlight read as different colours. HSV (or HSL) splits “what colour is this” from “how bright is it,” so you can keep a narrow threshold on Hue while letting Saturation and Value vary. That’s closer to what you actually want for “this red thing, under any lighting.”
Handle the hue wrap-around. Hue is a circle, not a line. Red sits at both 0° and 360°, so a naive abs(hue - target) < threshold misses half the reds in any image. The 2012 shader’s min(dHue, 2π - dHue) trick was already doing this correctly, but on its own it isn’t enough.
Gate on brightness and saturation. In deep shadow or blown-out highlights, hue stops meaning anything: a black pixel has no colour, a glare pixel has every colour. A minimum Value and Saturation cutoff keeps the splash from leaking into dark backgrounds and white walls, which were two of the original’s most obvious failure modes.
Normalise for white balance. iPhone auto white balance shifts the whole hue distribution scene-to-scene, which is why a “red” threshold tuned indoors falls apart outdoors. A grey-world pass (or sampling a known reference card) before selection gives you a stable colour space to threshold against.
None of this needs ML. A live HSV selector with brightness gating and white-balance normalisation would already be a real step up from the 2012 version, and it runs comfortably at 60fps in a Metal compute shader. The ML editor handles “select the dog”. A smarter live camera could handle “splash everything red in this room”. The two would complement each other rather than compete.
So it isn’t abandoned. Just queued for a future post.